
Venture is the major new mechanic in Adventures in the Forgotten Realms, and it’s one of the harder mechanics to evaluate we’ve seen in a long time. It’s flexible in that it lets you choose one of three dungeons and what path you’ll take through them, but restrictive in the relatively few choice each dungeon presents. It’s a linear mechanic that rewards you for reaching the end of a dungeon, thereby getting the best room bonus and also achieving dungeon completion for cards like Gloom Stalker. It’s also one of Magic’s most parasitic mechanics, interacting with almost nothing that came before.
A Tricky Nut to Crack
When you’re dealing with something this new, it’s easy to over- or under-estimate its potential. Venture is kind of like Energy in that it provides customizable rewards from variable inputs—Energy proved strong, so Venture could be, too. Energy gave total control over how it was spent while Venture is finicky about what bonuses it gives and when, so that’s a point in favor of Energy. And cards like Attune with Aether do nothing to consume energy, while Venturing always provides some benefit, so that’s a point for Venture.
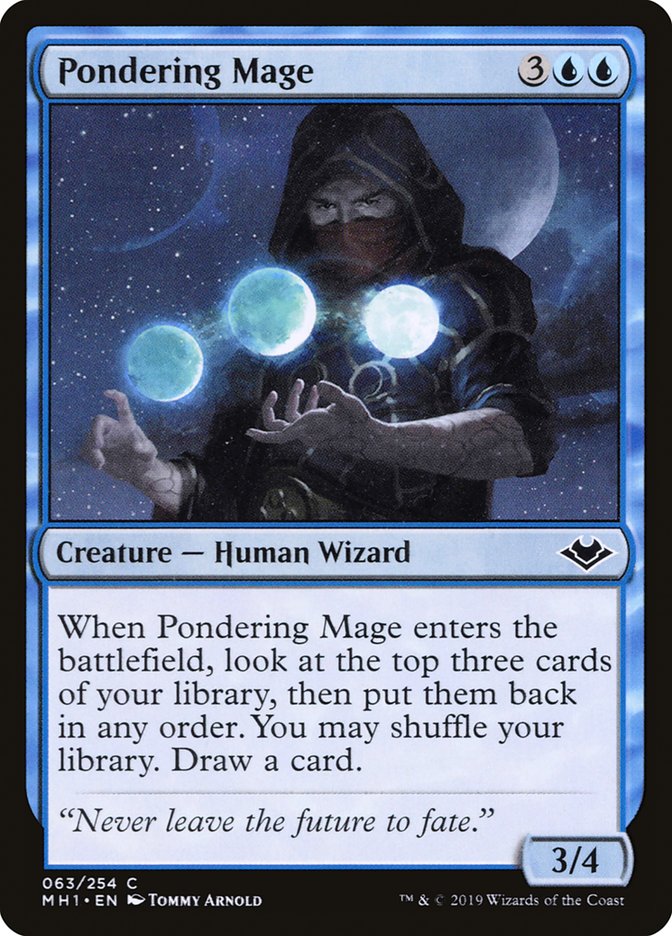
Venturing provides disparate effects that can be more than the sum of their costs. Ponder‘s constituent components of drawing a card is worth about a mana (closer to two when you’re tacking it onto an effect already worth a card) and rearranging the top of your library is basically free. Yet combine the two and you get one of Magic’s strongest cantrips. But dilute the effect over time as Suspend and Sagas do and the effect gets weaker. And unlike Sagas and Suspend, Venture doesn’t tick down naturally—if you can’t Venture further when you’re on the precipice of completing the Dungeon of the Mad Mage, you’re out of luck.

To some, Venture seems like an inherently weak and fragile mechanic. To others, it’s an aspirational, recurring source of value. Both perspectives are valid, especially when we’ve yet to see the full set spoiler (to know how easy it’ll be to Venture in both Limited and Constructed) and play with the cards ourselves. So, rather than evaluate the mechanic as a whole, let’s focus in on the micro scale: how valuable is each of the rooms individually? About how much mana’s worth of value do they each provide? And given that information, what does that say about the Dungeons themselves?
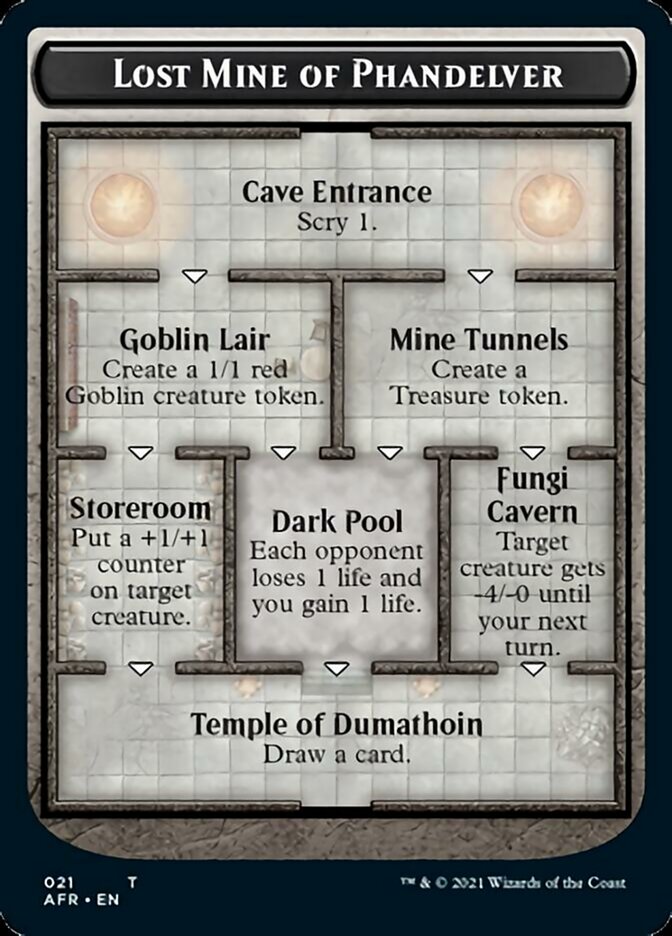
Room 1
Scry 1—By itself, you’d never play a card with this effect. But, add it something already playable, like Unsummon, and it’s worth a whole mana extra. Sometimes it’s worth a small fraction of a mana and doesn’t increase cost, as on Anchor to the Aether or Veteran Motorist. Let’s be generous and say it’s worth 0.5 mana.
Room 2
Create a 1/1 Red Goblin creature token—As with many dungeon bonuses, this is an effect so small as to not be on a card by itself. When you’re making multiple 1/1 tokens, each generally costs 1 mana (Raise the Alarm, Hordeling Outburst being more pushed examples). Let’s also call it 0.5 mana.
Create a Treasure token—Another effect we never see on its own which tends to add about 1 mana (Seize the Spoils, Unexpected Windfall and heck, Depths of Desire adds 2). Treasures have a large amount of utility (ramp, color fixing, an extra permanent, an extra artifact, something to sacrifice) which is further bolstered by AFR having cards which give you benefits for spending treasure. So, let’s round up and say this is worth about 1 mana.
Room 3
Put a +1/+1 counter on target creature—At instant speed, this is worth one mana. At sorcery speed, 0.5 mana seems generous.
Each opponent loses 1 life and you gain 1 life—Extorting is an incredible mechanic when you’re doing it repeatedly and bleeding your opponent out. On its own, this is probably the first room worth 0 mana. (We’re only going in increments of one half, but even if we were slicing costs thinner, it might be generous to call this worth 0.25 mana.)
Target creature gets -4/-0 until your next turn—As with the Storeroom, this is worth ~1 mana at instant speed and loses much of its value when it can’t be used as a combat trick. Having a full turn’s delay effectively makes this into a one-use Change of Heart. It’s not worth much, but it could keep you alive to complete the room. Let’s call it 0.5 mana.
Room 4
Draw a card—Ah, we’ve reached a familiar effect. By itself, this is worth 1 mana. When combined with other effects (such as when stapled onto a creature), it usually costs 2 mana. We’ll call it 1 for now since you need to wait and work for it, but time will tell just how much effort Venturing four rooms actually is.
Dungeon Completion—This is the hardest reward to evaluate, since it depends entirely on what cards you have available. This is a minor bonus with Dungeon Crawler, a moderate bonus with Precipitous Drop, a major bonus with Nadaar, Selfless Paladin, and worthless if you have nothing that cares about completion. We won’t add any mana value here (since you’re generally paying for it on the cards that care about completion), but this could be worth a lot. It’s also worth noting that the Lost Mine of Phandelver is probably the best dungeon for dungeon completion, since it’s almost half the length of Dungeon of the Mad Mage and all-upside, unlike the one shorter and far more painful Tomb of Annihilation.
Adding all of these factors together, it seems like you can expect about 3 mana of value from the dungeon or a little less than 1 mana per room.
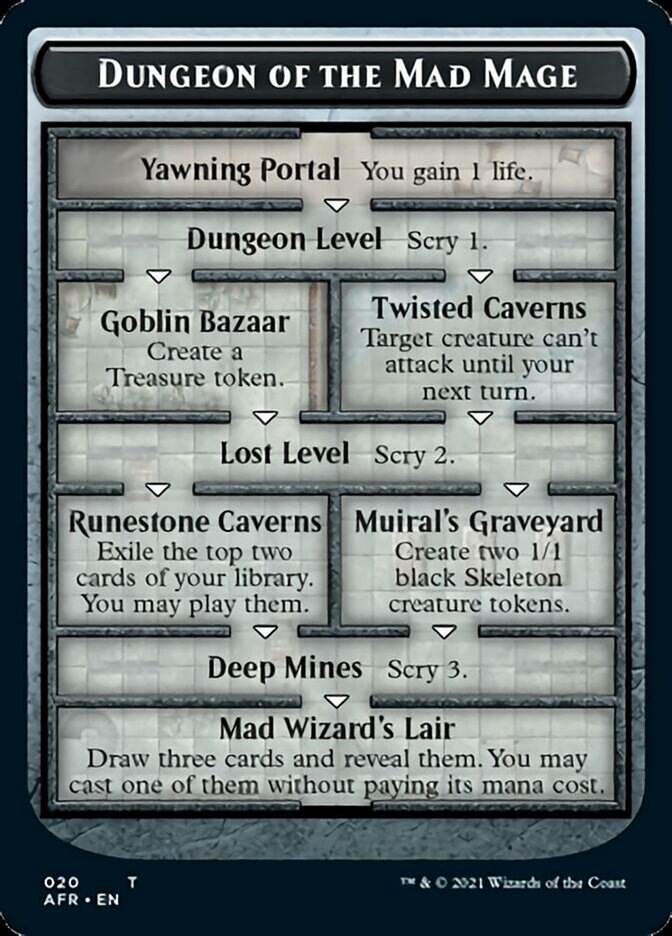
The Dungeon of the Mad Mage provides both the largest rewards and the most delayed gratification.
Room 1
You gain 1 life—if draining your opponent for 1 was worth 0 mana, this is absolutely worth 0 mana.
Room 2
Scry 1—already evaluated this at 0.5 mana. We’re off to a slow start.
Room 3
Create a Treasure token—1 mana.
Target creature can’t attack until your next turn—This is fairly similar to (and even more defensive than) the Lost Mine of Phandelver’s Fungi Cavern. Let’s say it’s also worth 0.5 mana.
Room 4
Scry 2—at what point does Scry go from being worth half a mana to a full mana? Magma Jet would say it’s good enough already, while Serum Visions wouldn’t. Foresee says Scry 4 is definitely worth a full mana, so let’s be conservative and round it down to 0.5 mana. Yes, Scry 2 is worth more than Scry 1, but not twice as much.
Room 5
Exile the top two cards of your library. You may play them—this is a highly restrictive form of Divination. You can go up two cards, but you can’t play two lands or make use of reactive cards. We’ll call this 2 mana, already making it the highest-value room visited yet.
Create two 1/1 black Skeleton creature tokens—From Dragon Fodder to Servo Exhibition, this is a staple effect at 2 mana.
Room 6
Scry 3—doubling Scry 1 wasn’t enough to double its value, but I think we can say that tripling the effect is sufficient to go from being worth 0.5 mana to 1 mana.
Room 7
Draw three cards and reveal them. You may cast one of them without paying its mana cost—we’ve never seen an effect like this before. Concentrate is worth 4 mana, but you’re also tacking on an Unexpected Results where you have some control over the outcome. Getting to draw 3 cards and Mind’s Desire the best of them is a pretty huge benefit. I’d guess that this is worth about 6.5 mana, though I’m not sure Wizards would even want to print a 7 mana sorcery with this exact effect.
If you’re aiming for dungeon completion or not playing the long game, this is the worst dungeon for you. But if you’re aiming for value, you’ll on average get about 1.5 mana per room and that’s despite the slow start. Not a bad deal, assuming you’ve got the time to spare and sufficient capital for Venturing.
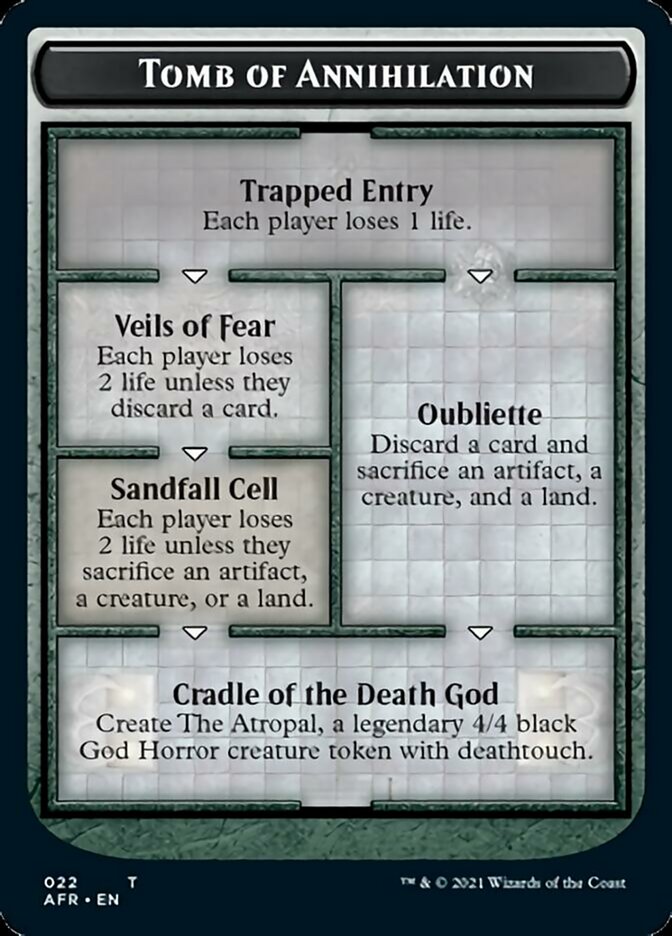
The most painful and perilous of dungeons, the Tomb of Annihilation isn’t for the faint of heart.
Room 1
Each player loses 1 life—This is the first effect we’ve seen that can be actively detrimental to the caster (a theme we’ll see repeatedly in this dungeon). While it’s helpful if you’re the aggressor, it’s still not the kind of effect you’re eager to pay for. If draining 1 life is worth 0, this certainly is also worth 0 mana.
Rooms 2 + 3
Discard a card and sacrifice an artifact, a creature, and a land—Smallpox is a powerful card in a deck built to abuse its symmetry. Here, you’re just hurting yourself. Even if this is just discard a card and sacrifice a land, that’s an enormous sacrifice to make. This is probably worth at least -3 mana on its own, but it at least comes with one benefit: it skips a room—and that might just be worth +1 mana if your deck really wants to complete a dungeon ASAP.
Each player loses 2 life unless they discard a card—As with room 1, this can be detrimental, but you’re starting to do enough damage that it could matter to your opponent. An aggressive deck willing to venture into the Tomb of Annihilation might be happy to cast half of a Flame Rift that comes with a free God Horror. It’s still not great to suffer this punishment yourself and for its effectiveness to be so context-dependent, but this should be worth at least 0.5 mana, assuming you can take advantage of it. Otherwise, it’s worth 0 mana.
Each player loses 2 life unless they sacrifice an artifact, a creature, or a land—This room is even more context-sensitive. In the early game, your opponent will be happy to pay the 2 life. In the late game, they’ll likely have an excess land or Treasure to sacrifice. But if you’re the aggressor, the life or resource loss will hurt them more than it’ll hurt you. Losing 2 life isn’t a big cost to pay, but when it’s immediately following another 2 life payment, the damage can start to add up. Let’s say this is again worth about 0.5 mana.
Room 4
Create The Atropal, a legendary 4/4 black God Horror creature token with deathtouch—A 4/4, you say? Yeah, I’d happily pay 4 mana for that. It’s worth noting that this is both by far the most aggressive output one can get from a dungeon and it synergizes with the life and/or resource loss from the Veils of Fear and Sandfall Cell, or can bring you back into the game after suffering through the Oubliette alone.
If you go the slightly slower route, you’re looking at about 1 mana per room (though the rewards are all at the end), while the faster route is worth 1 mana total. But these numbers are deceptive, since a properly aggressive deck that can avoid or ignore the pain or exploit an early dungeon completion bonus will value the Tomb of Annihilation highest among all dungeons.
Putting all of our information together, we’ve got a rough map of how to Venture. Slower, grindy decks will seek to maximize value in the Dungeon of the Mad Mage (but they need a lot of Venture to reach the lower levels that justify the anemic upper levels). The Lost Mine of Phandelver provides consistent and relatively flat rewards with an easy dungeon completion. The Tomb of Annihilation is the fastest to complete but the most context-sensitive—a stalled trip through the Dungeon of the Mad Mage will be frustrating, but a foolhardy Venture down the Tomb will seal your doom. On the other hand, forcing your opponent through Annihilation with you could hasten their demise.
Hopefully those heuristics will prove helpful once we get to play with Adventures in the Forgotten Realms. They’ll be shaped by availability of Venture effects—if Venturing even three times is a serious challenge (or takes too much time), then the Dungeon of the Mad Mage will provide the least attractive path. If Venturing is relatively easy, then it might be far better to loop through the Tomb of Annihilation twice than to traipse through the Lost Mine of Phandelver. But for now, all we can do is prepare our parties for the eventual roles we’ll play.
And, as always, thanks for reading.
Zachary Barash is a New York City-based game designer and the commissioner of Team Draft League. He designs for Kingdom Death: Monster, has a Game Design MFA from the NYU Game Center, and does freelance game design. When the stars align, he streams Magic (but the stars align way less often than he’d like).