
Zenaide brings us a fantastic tutorial on working with Thibra thermoplastic to create the feathered Helm for her Nylea cosplay.
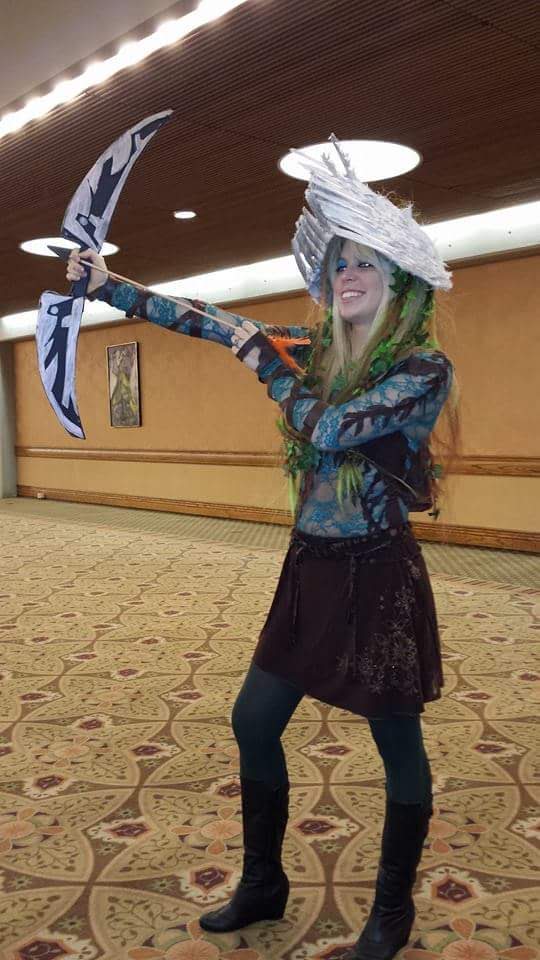
Can you picture Nylea, the mono-green God from the plane of Theros? Maybe you picture her iconic weapon: the Bow of Nylea. Or maybe it’s her aesthetic; how could one not take note of her verdant, foliage-entwined garments? For me, her silver-winged headpiece stands out as a constant throughout all of her depictions found on various Magic: the Gathering cards.
She was first printed in the first visit to Theros in 2013 as Nylea, God of the Hunt, and more recently in 2020 she returned as Nylea, Keen-Eyed in Theros Beyond Death.
When I cosplayed Nylea during Theros, she was my third cosplay ever. Needless to say, my skills have greatly improved over the seven years since then! My original headpiece was made with Halloween angel wings split in half, and was basically just a wing-shaped piece of cardboard stock with faux white feathers already glued on. At the time, I also didn’t want to bother with wearing a wig, or purchasing one! My solution to achieve her look of massive locks was to buy two cheap wigs, one green, one brown, and hot glue wefts of synthetic hair to the underside of the wing cardboard, with braided-in strands of plastic ivy so it would sit on top of my head, naturally covering most of my own hair.
In comparison to the leotard and quiver I made, the headpiece had the least amount of effort invested. It was literally a cardboard tent with fake hair weighing down the front sides to keep it barely balanced atop my noggin. To add, I threw out the headpiece a few years ago. I knew a revamp was required for her headpiece to match the superbness of the rest of my original Nylea cosplay.
Cosplaying at a PTQ in Eugene, OR with Addictive Behaviors. Photo Credit: @ABGames
Molding Many Feathers
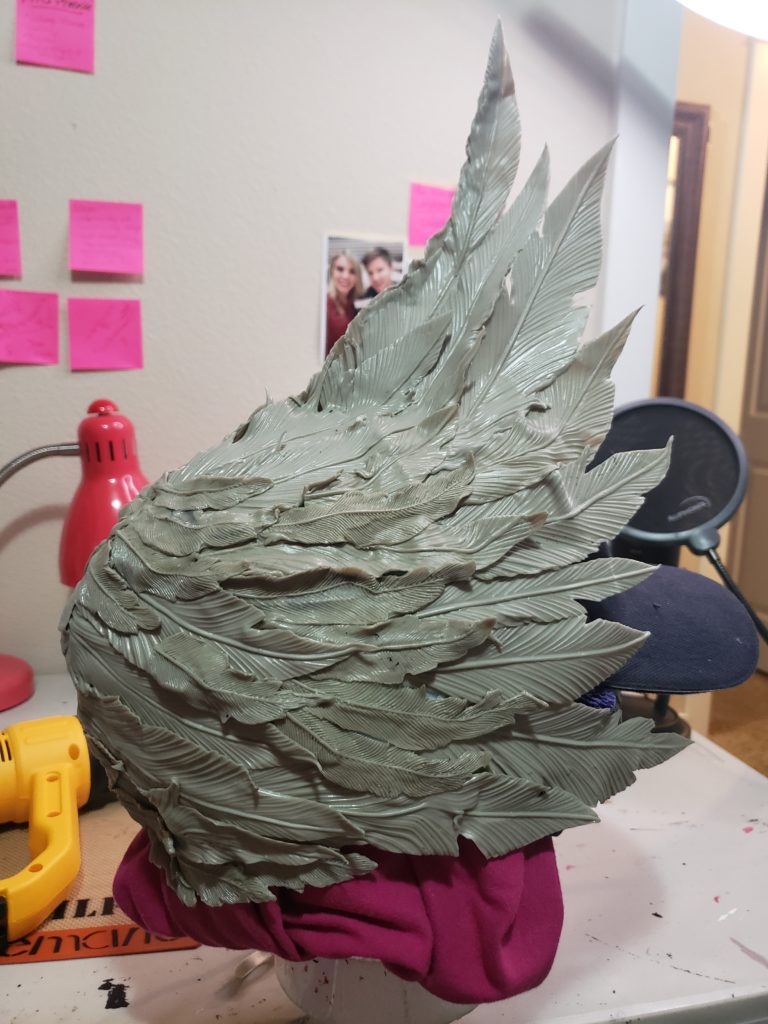
On this project I chose to start with familiar territory using Thibra, a grey-tan colored thermoplastic, to make molded feathers. One of my cosplays from 2019 was Serra the Benevolent who has feathers along her armor, so I already owned the molds I needed. I studied each of the depictions of Nylea found on art from her God cards including the constellation Showcase art and Nylea’s Intervention. After counting the feathers along the side view of the helmet and “guesstimating” for the back of the helmet coverage, I concluded at least 50 feathers would be needed.
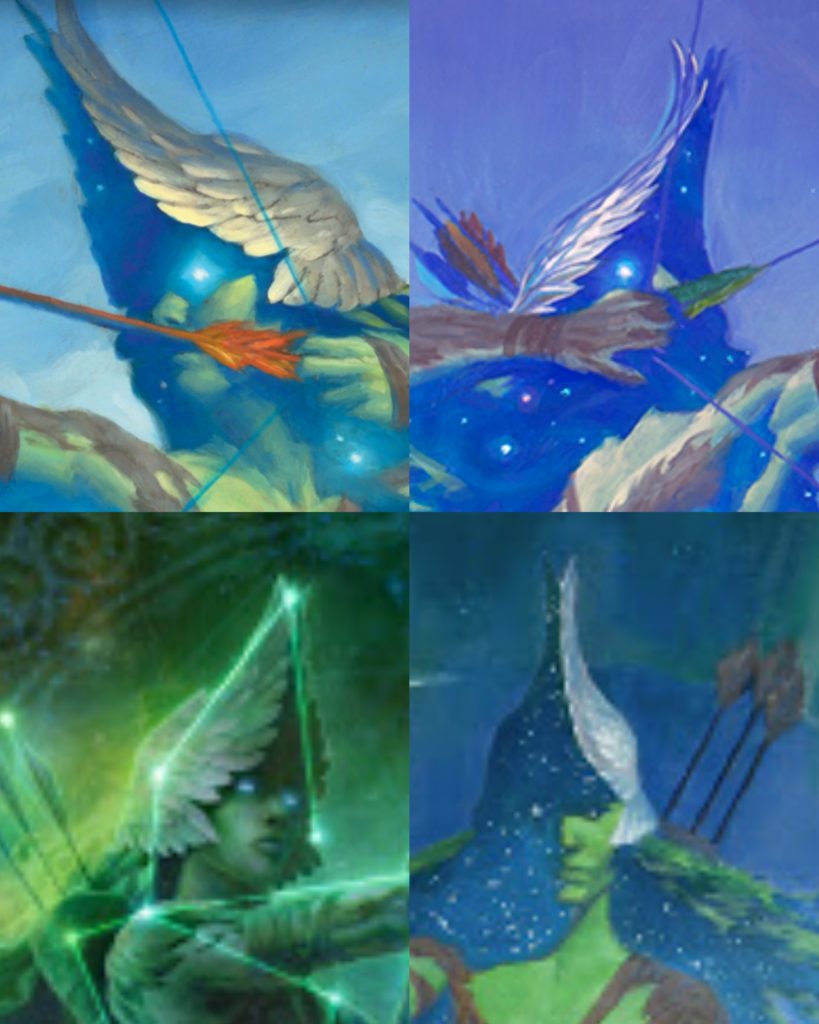
Top Left & Top Right illustrated by Chris Rhan. Bottom Left illustrated by Jason A. Engle. Bottom Right illustrated by Zezhou Chen.
Molding the feathers is easy once you get the hang of it. Thibra needs to reach a temperature of about 120°F (49°C) to become flexible and soft. Using silicone molds which resist high heat, just like silicone cookware, the desired shape can be easily achieved, and key to any project, easily repeated.
The thermoplastic material needs to be hot enough to be kneaded like clay when pressing the mold together. On the flip side, if the Thibra is too hot, it will appear shiny, even glossy, or dewy, and take a lot longer to firm. It will take some practice to find what temperature settings you prefer to use for safety versus speed.
I found it most convenient to apply heat with a heat gun with temperature settings. I tend to turn my heat gun up to at least 350°F (177°C), sometimes as high as 450°F (222°C), to give 30-second-long bursts in sweeping motions, to heat my sample initially. From there I will use short bursts of heat if I need extra moldability.
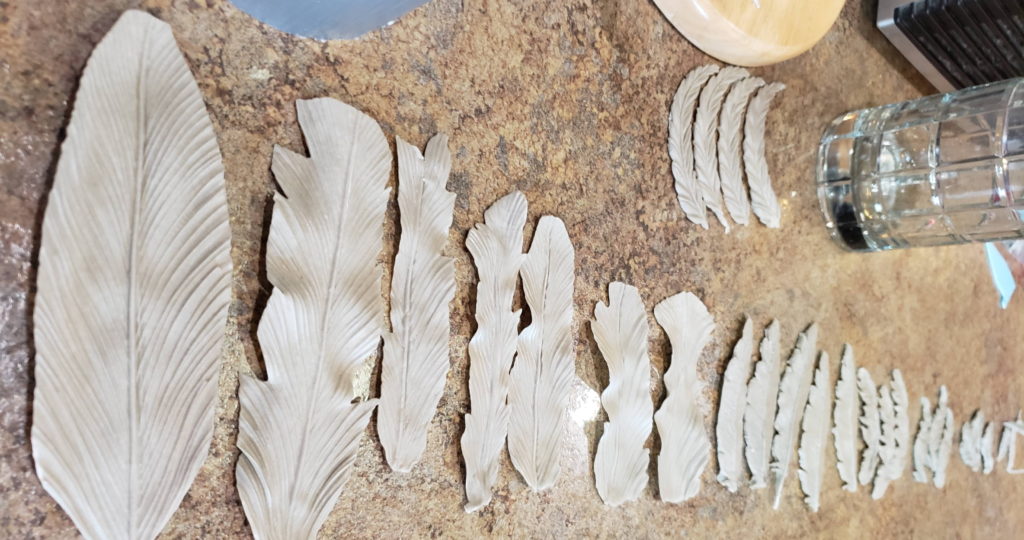
Feathers made from Thibra
HOT TIPS:
- Heat on a silicone mat to protect your surface underneath.
- Wet fingers with cold water to avoid leaving fingerprints while hand-molding.
- Use silicone “heat fingers” to reduce accidental burns—like a thimble for sewing!
- Use metal tools (like a seafood fork!) to press Thibra into small details of molds.
- Keep a bowl of ice water nearby to dunk pieces to solidify Thibra quickly.
- If you mess up you can always re-heat and start over!
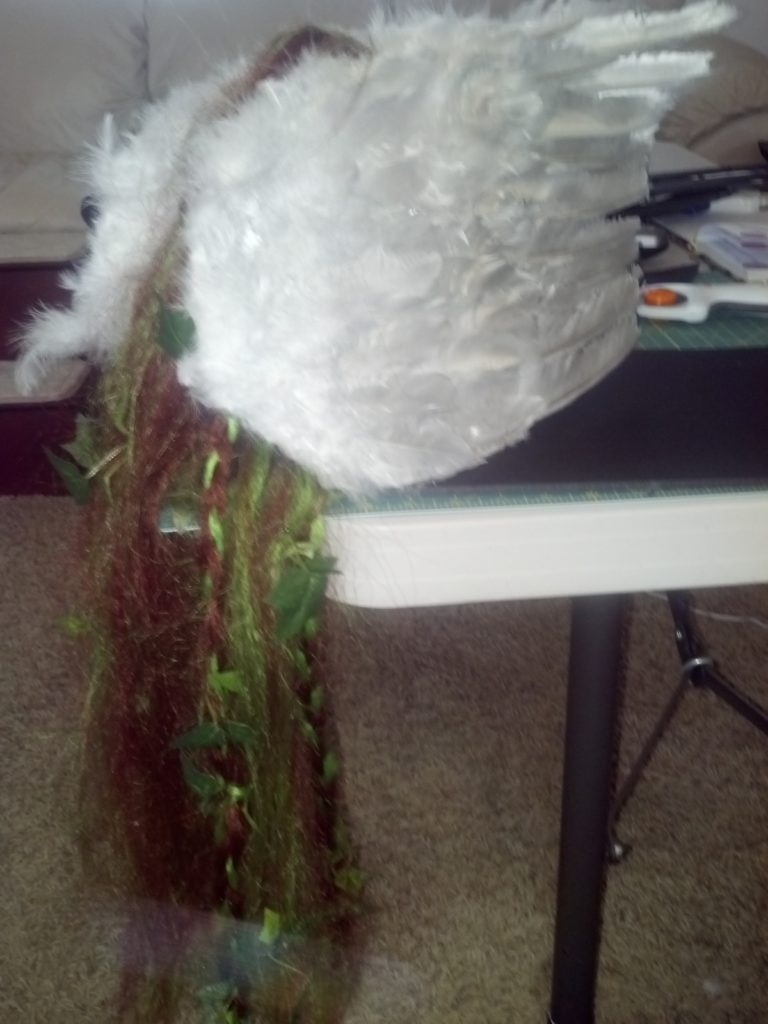
From previous molding of feathers, I knew it would take a bit of time. For my first batch I ended up making 26 large feathers and 50 medium feathers, some with unique cuts, and all with hand-shaped delicacy. They were finished over the course of a three hour stream. After I made the base and started covering it (which I go into below), I realized I would need a few more feathers. I spent another 45 minutes making another twenty or so feathers. Can you believe roughly 100 feathers were used to decorate Nylea’s helmet?!
Want to see molding Thibra in action? Watch this demo video I made:
At 5:13, the double-sided feather mold I use is the same as the medium size feathers I referenced above.
At 7:39, Forming feathers while still warm after mold.
Back to Basics
I wanted this version of Nylea’s helmet to fit similar to a hat or headband, giving a feeling of security, yet still having room underneath for a wig. After calculating the necessary circumference, I used what I had on hand: a baseball cap on top of my styrofoam mannequin head, stuffed with a hand towel. This allowed me to match up the measurements for me to sculpt around. In cosplay, creativity isn’t just in the end product but how you get to it! It was this action that inspired my pattern of the base to be first laid down in triangles, just like the seams of a ball cap.
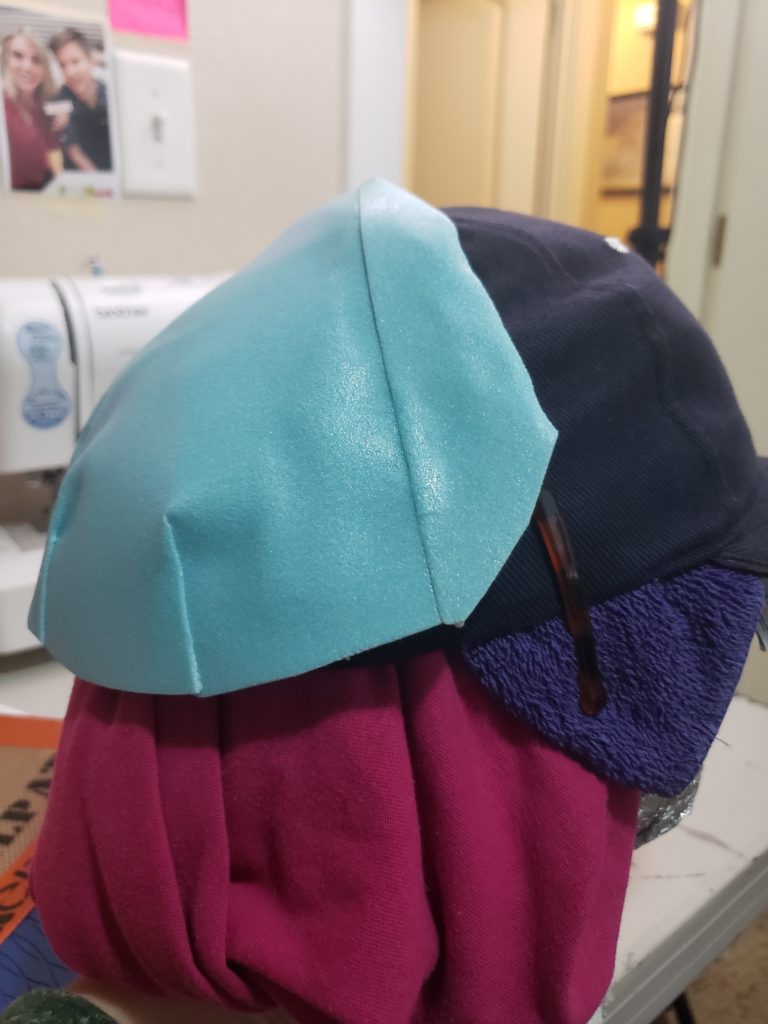
To create the base I used a different type of Thibra than the feathers, Thibra Tex, which is blue in color and has a mesh on the underside to provide extra durability. All types of Thibra can adhere to each other when heated up, by being layered, or making press-together seams. I cut two large triangles initially to cover the upper quadrants of the back of the head, and added darts. Darts, in sewing, are folds used to make fabric lay nicely along curves, I simply applied the same systematics to my sculpting. Then, using an old plastic headband, I layered strips around the headband and connected it to the triangle base.
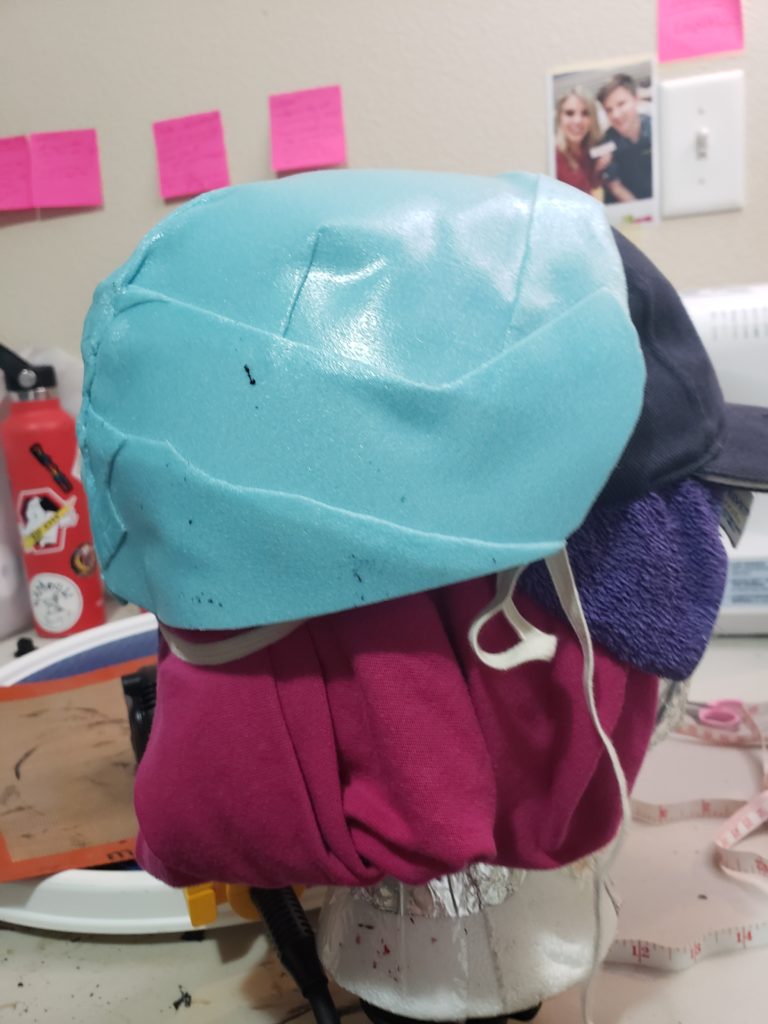
From here on out, I switched to using scraps of Tex from previous projects, which would ultimately be hidden under the pretty molded feathers. I hadn’t measured how far down I need to go, but just added 1-2” scraps, trying it on after adding each extra piece. To finish off the base I used scissors to even the bottom from the scraggly scraps I used!
Affixing A Feather… Or Two… or Hundred!
Most of the reference photos are from profile view or a 45° angle, which made me put the most emphasis on the correct placement of the face-framing feathers. I worked my way up from the lowest feathers to ensure I wouldn’t be poking myself when looking down. There was also an obvious lower layer of feathers apparent in all the artworks I wanted to achieve. By starting down low and working up, I was able to choose preferred placements for my face. Trying it on throughout this step was also crucially helpful.

The next challenge was making the plumes peak up to a point. I started creating the shape of the middle part where the two sides of the helmet meet by cresting feathers alongside one another. Then, I was able to build on top of each side of this part, extending large feathers out towards the front of the head at an upward sloped angle. The peak ended up being about 2-3 large feathers tall!
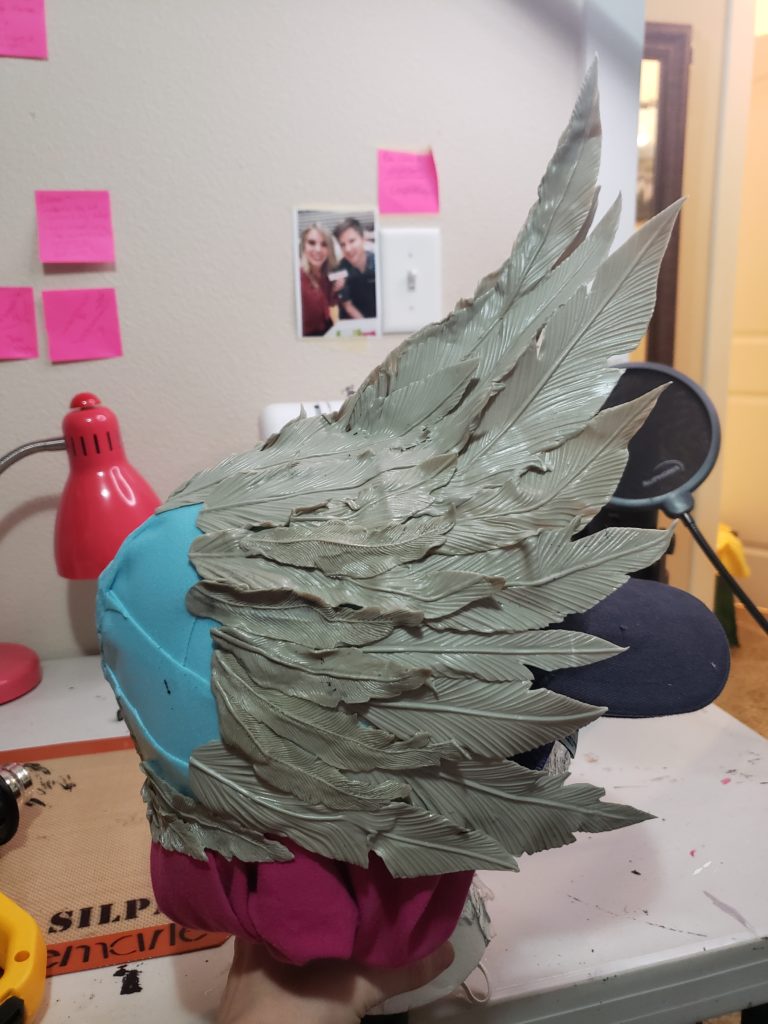
From here, finishing the form of the helmet was fast. I worked my way around laying pre-molded feathers with light heat applied to both the feathers and the base. Each feather has its own special flare, as they fill the negative space together; they fly away from the helmet itself, like a real feather in the wind!
Painter’s Servant
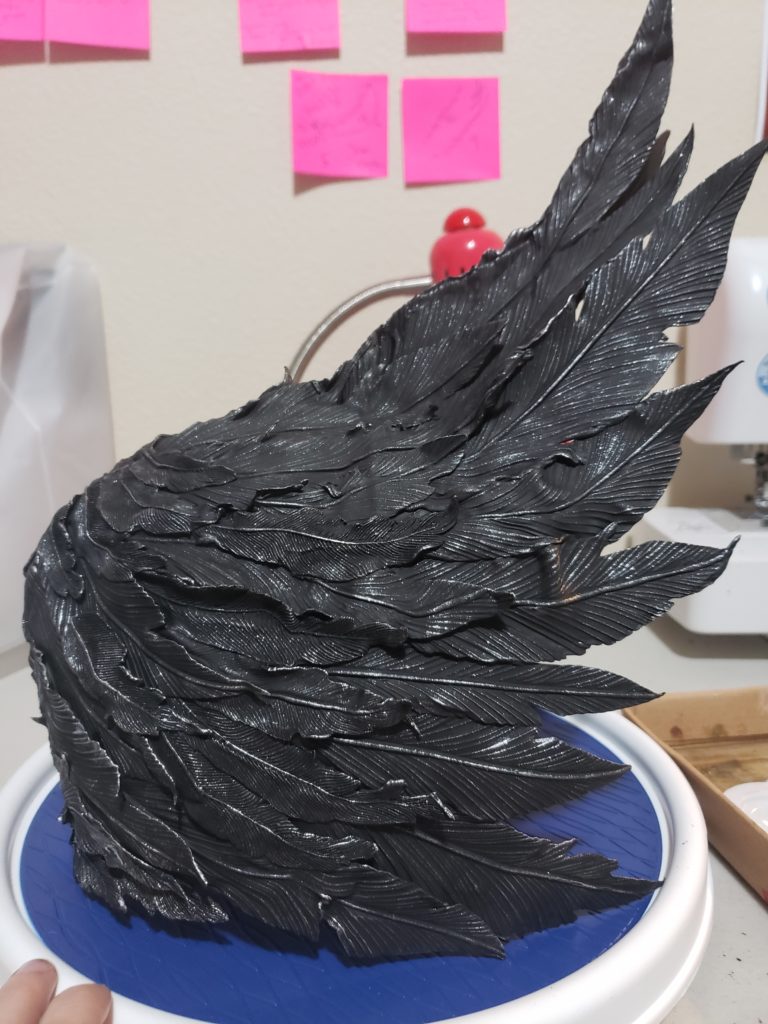
All that remained was to paint the pretty plumes to make the headpiece come to life. I used an airbrush to apply a black base coat. The advantage of using an airbrush was in filling all the small filament details of the feathers without getting too much paint in them so they disappear. The fine spray of an airbrush gives a nice, thin, even coat. By using black as my base coat, the shadows and small spaces are finished for the project.
Stroke of Genius:
One alternative way of getting shadows is by black-washing as a final step. Use watered down black paint on all painted parts of a piece, then wipe it off with a paper towel, hitting the high points, and leaving black paint in the crevasses.
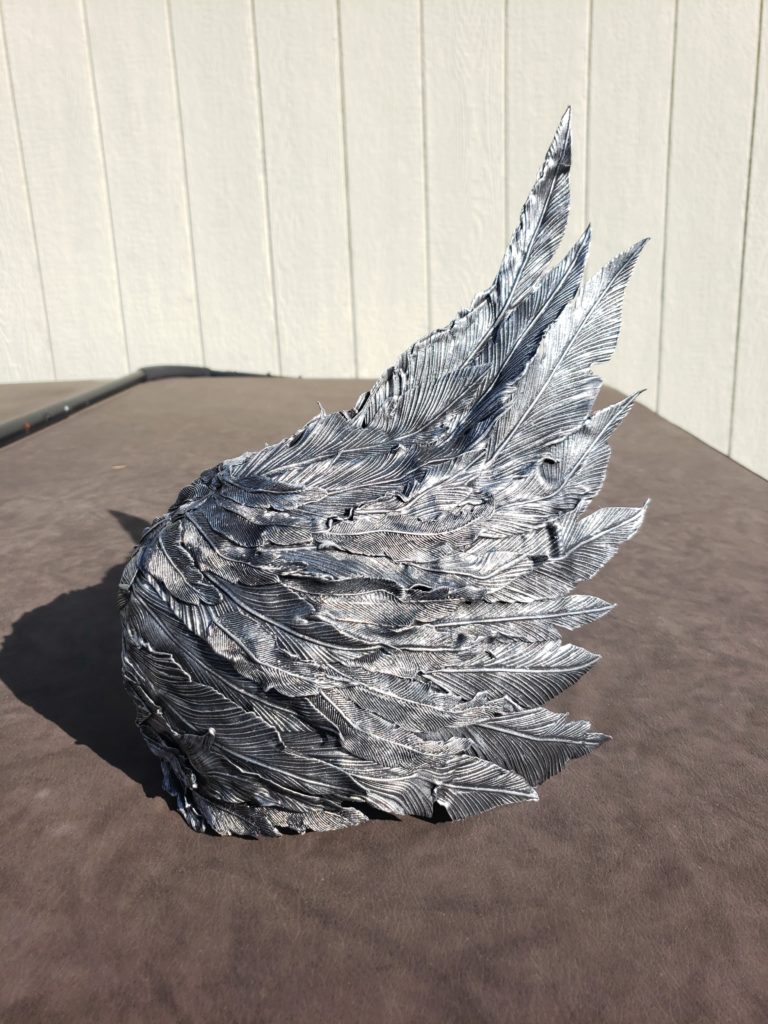
The only step remaining is to get the silver color shining in all of its glory. I did all of the silver in coats of dry brushing. Dry brushing in painting is when you get almost all the paint off of your brush by wiping it off and brushing it off on a towel first, then applying the smallest amounts of paints in the desired direction. For me, I want the way natural light would hit to be the highlights and most silvery parts of the headpiece so I went in brushstrokes from north to south and some 45° angles, but never south to north.
Half Black Base Coast, Half 1 Silver Dry Brush Coat
I ended up doing three dry brushing coats in total to get the amount of silver I wanted to contrast the shadows. On my last of the three dry brushing coats I even added a little white in with the silver to make sure the highest points, most frequently hit with light, would appear as they do naturally in the sun.
1 Coat of Silver Dry Brushing
Drybrushing Tip
When drybrushing, use the rattiest, most mis-cared for brush. That one you forgot to clean? Or the one that has bristles going every direction? Those ones will give you the best result for this technique!
Drybrush one coat at a time and let it dry completely. It’s easy to add more coats, but feels bad when you add too many coats. Stepping away and looking at the piece from a distance or other normal angles (don’t hold it upside down!) can help you determine if you want more coats.
All in all, my new and improved Nylea headpiece took about ten hours to complete. I took time to make sure I had plenty of feathers of varying sizes to play around with and consulted my mirror frequently when fixing to make sure everything looked correct! I am very pleased with the final result and how it looked accompanying my Showcase cosplay of Nylea-Keen Eyed at Magic Fest Phoenix 2020.
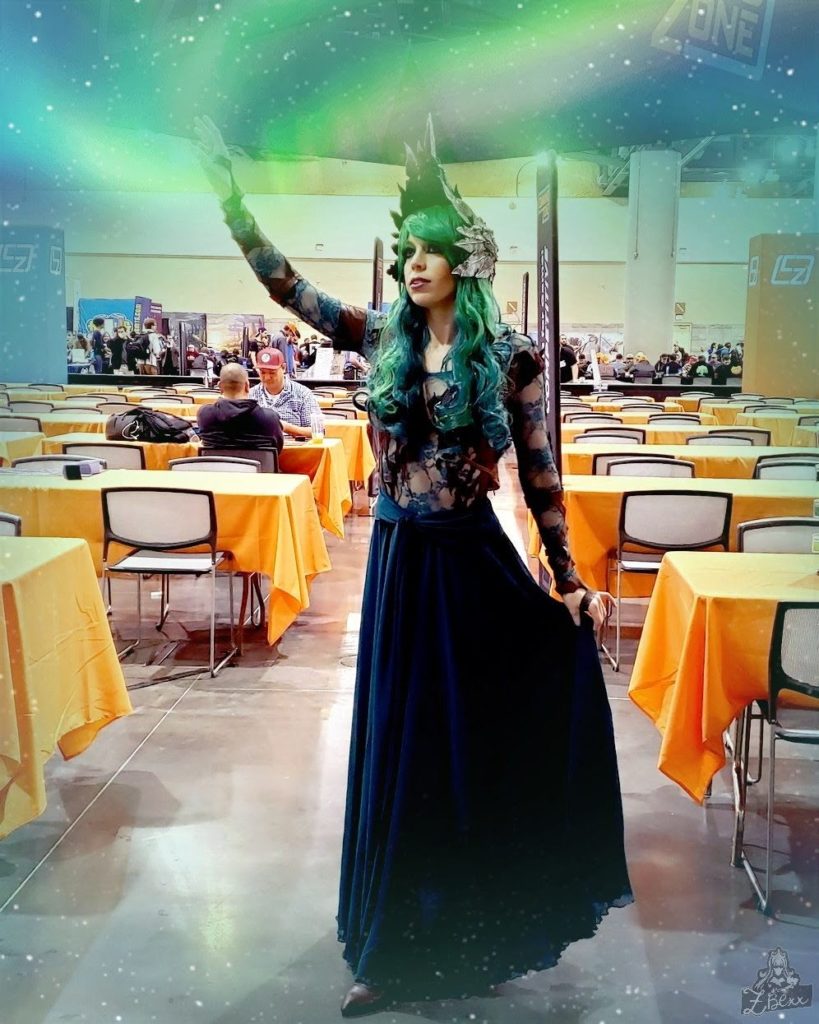
In the Command Zone at the start of the Day 3, Magic Fest Pheonix 2020, with Channel Fireball. Photo Credit @WitchyCrochets
Stay tuned for more Cosplay in the Multiverse when we take a look at some Faces of Jace.
…wait, wasn’t that title of the column’s previous article? Is there a Time Reversal going on here?
Looks like you’ll have to find out! Feel free to reach out to me on Twitter if you have any questions about crafting this cosplay Helm, or about using thermoplastics.
Zenaide “ZBexx” Beckham is an Oregon-based cosplayer, gamer, and MTG judge. Her favorite format is Legacy, because just like performing in dance or cosplay she gets to Show and Tell.