
Pick up the nearest Magic: the Gathering cards and look at the character’s garments in the art. There’s a good chance at least one or more depicted are wearing armor. A necessity such as armor for creatures and planeswalkers dueling on the battlefield means it is also a key element for cosplayers to create with their costumes. There are many steps involved making armor including planning, patterning, assembling, painting and attaching. In this article we’ll take an adventure in armor using foam and thermoplastics. We’ll be talking to a guest cosplayer Kensadi about materials, and then we’ll cover making armor from start to finish.
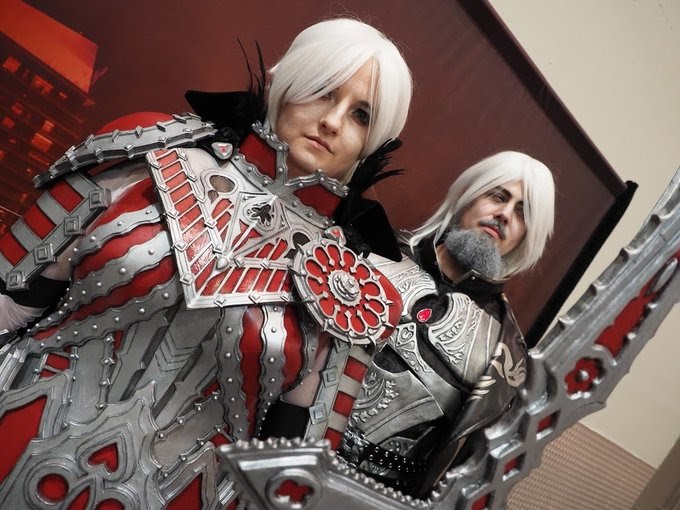
Kensadi as Edgar Markov and Old Man Urza as Sorin Markoc Photographed by @BibliovoreOrc at MTG Vegas 2019.
I’m excited to take you through the process of making your own armor with cosplayer Kensadi, who has made amazing armor projects like Edgar Markov shown above. She has been making cosplays for herself and her partner (@OldManUrza) since 2014 presenting duos like Liliana of the Veil & Garruk Relentless to Edgar Markov & Sorin Markov more recently. She also had a preview card, Ashiok, Sculptor of Fears from Wizards of the Coast for Theros Beyond Death.
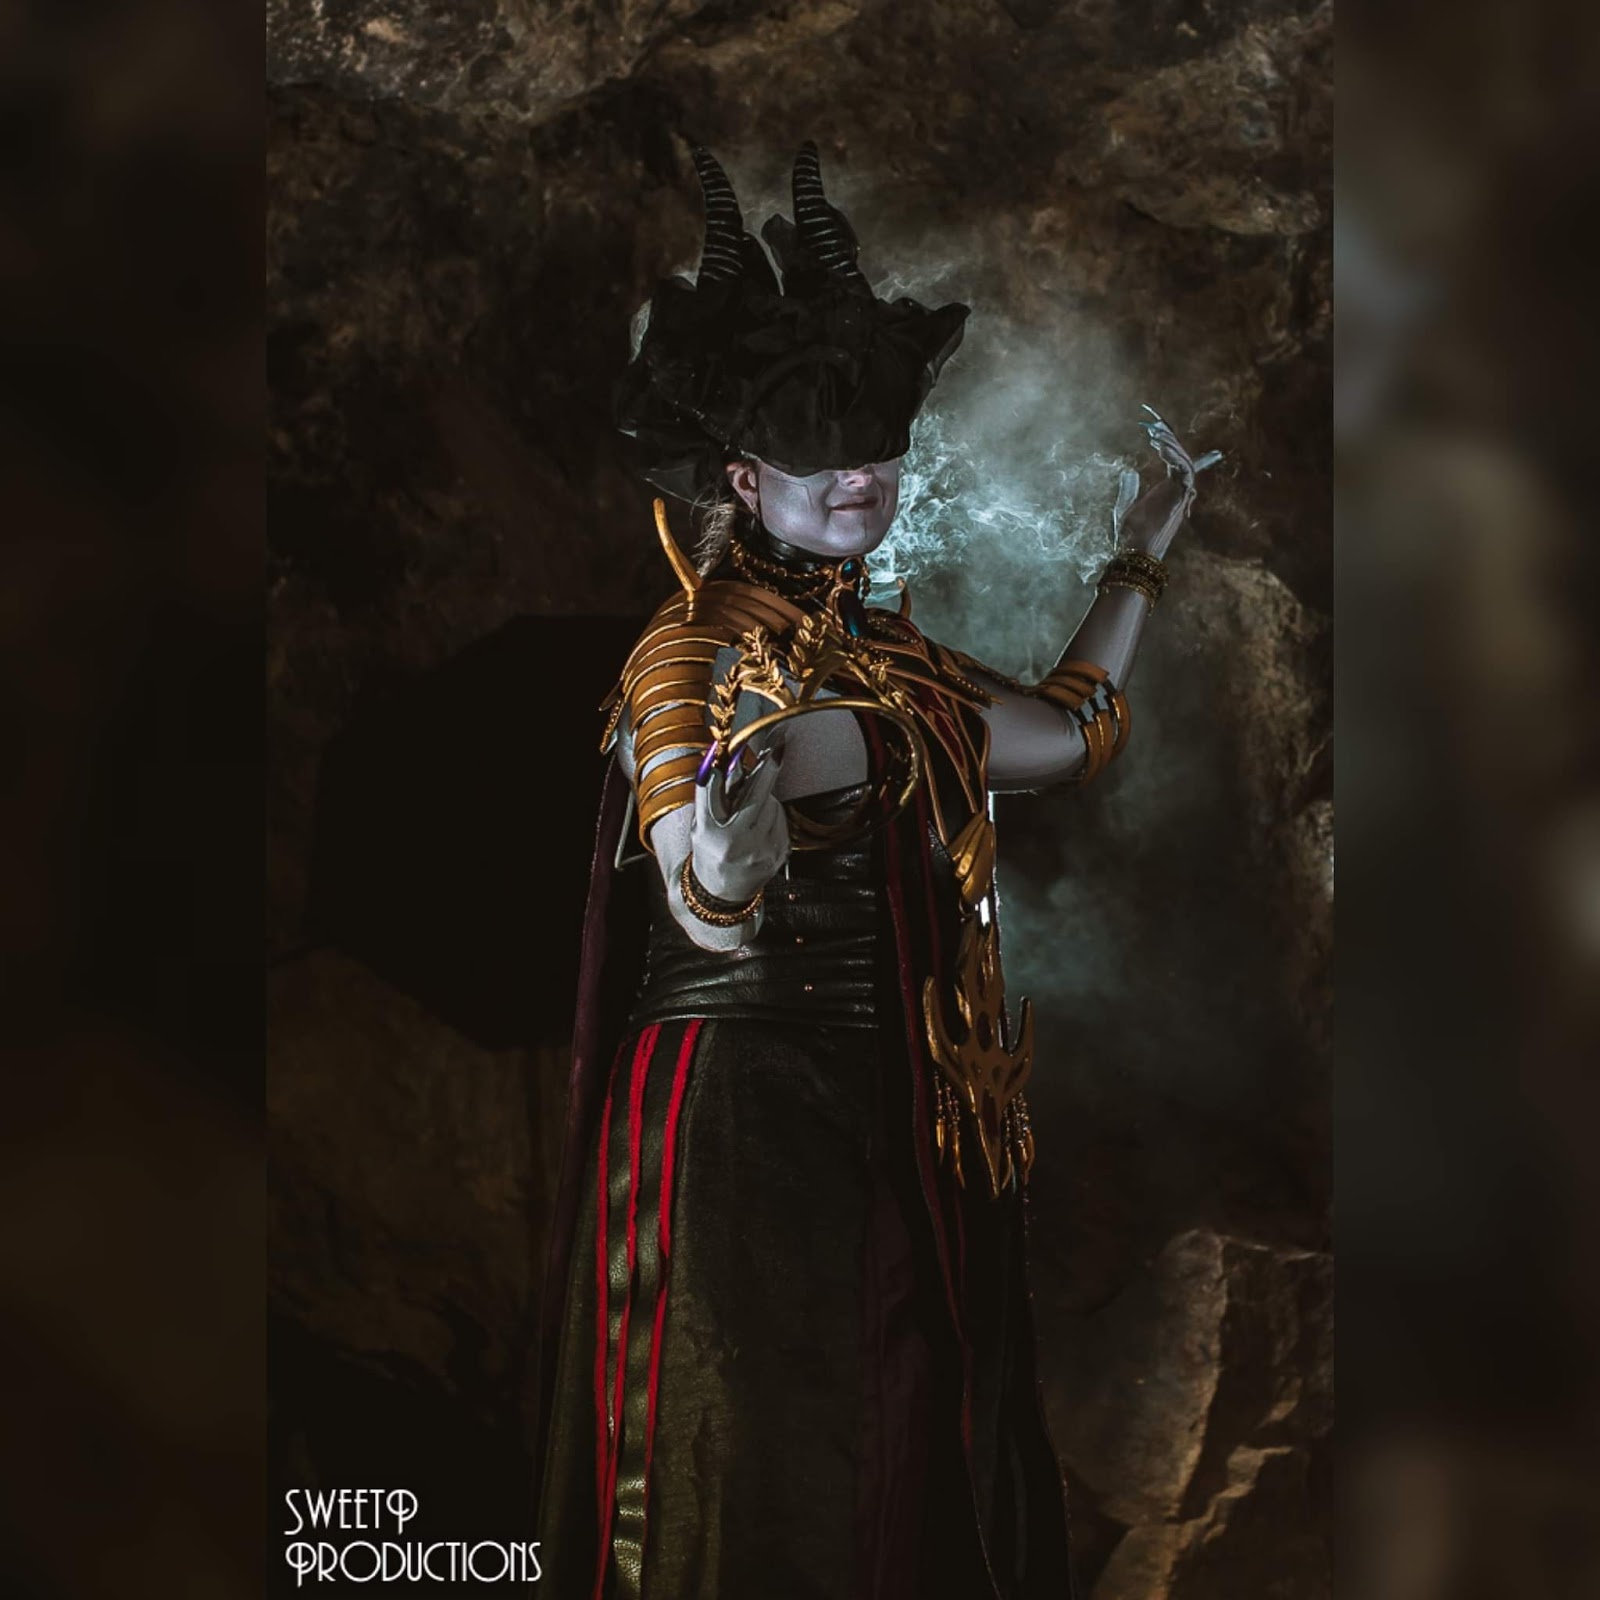
Planeswalker Ashiok. Photography by Sweet Pea Productions.
Before we get to the more hands on instructional, let’s break down the materials you can choose to make armor out of.
Materials
It’s awesome with the age of technology and manufacturing the materials a cosplayer can find easily accessible; most popular are EVA foam and non-toxic thermoplastics. To purchase materials follow these links: EVA Foam, Worbla (US & Canada), and Worbla (Europe).
You may already be familiar with EVA (Ethylene-Vinyl Acetate) foam, it’s the closed-cell squishy stuff used to make yoga mags, flip flops, life jackets and other types of sports equipment! Originally cosplayers would hack it with these household items but now there are companies producing specialized products like foam sheets and pre-cut foam scales and bevels. Kensadi recommends 4-6 millimeter thick foam for leg armor, breastplates, bracers and other armor pieces. Layering sheets and bevels will give armor designs that pop!
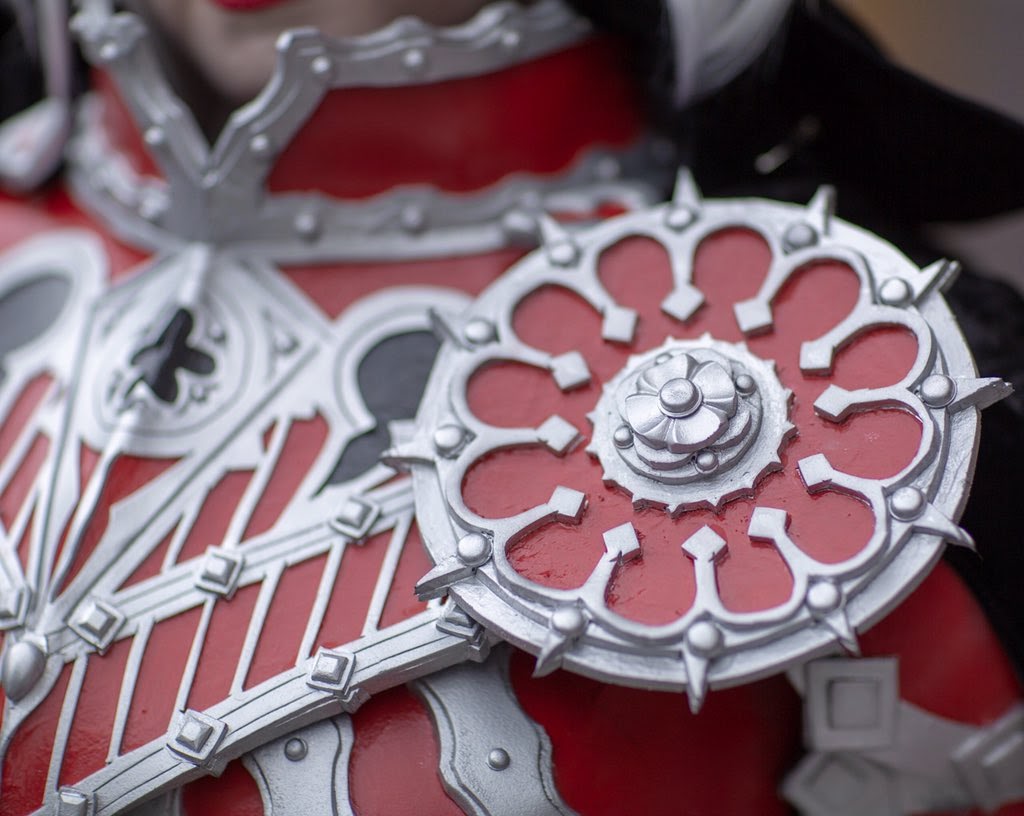
A close up of foam made armor Edgar Markov. Photographed by AntTree Studio.
Thermoplastics are the other material you will find used for armor making, often needing to be purchased from a craft store or specific retailer. They are plastics made to become soft and shapeable when heated and hardened when cooled. There are a few different brands you will find cosplayers referring to, all with slightly different characteristics, most commonly used is “Worbla’s Finest Art.” Thermoplastics are unique because they can be stretched over curves and have self-adhesion properties, meaning you don’t need glue if you are sticking two pieces of thermoplastic together.
Which material is best?
Kensadi says, “It comes down to what you’re making. If I’m making weapons I like Worbla because it’s more resilient.” By comparison, “foam is way lighter way more forgiving. If it falls on the floor it’s not going to crack just get creases in it. Start small, start simple and work your way up from there.”
You can correct mistakes more cheaply with foam. As she explains, “Worbla is an expensive material: foam you aren’t going to cry as much if you completely have to throw something away and just know failure happens.” By planning your project out you will have a better idea what your specific needs are.
Planning & Patterning
Kensadi proves the worth of planning and patterning from the results of her epic projects like Edgar Markov. Her first all-foam cosplay and her favorite to date; you may have seen her wear it at Magic Fests Oakland, Seattle and Vegas in 2019. Her first big builds helped her learn a large number of lessons to get where she is today and determine her choice materials. For example, making Desolation Angel completely out of Worbla was the “angriest, heaviest thing I’ve ever made.” By having a pattern you will be able to more easily determine which materials are best for your project.
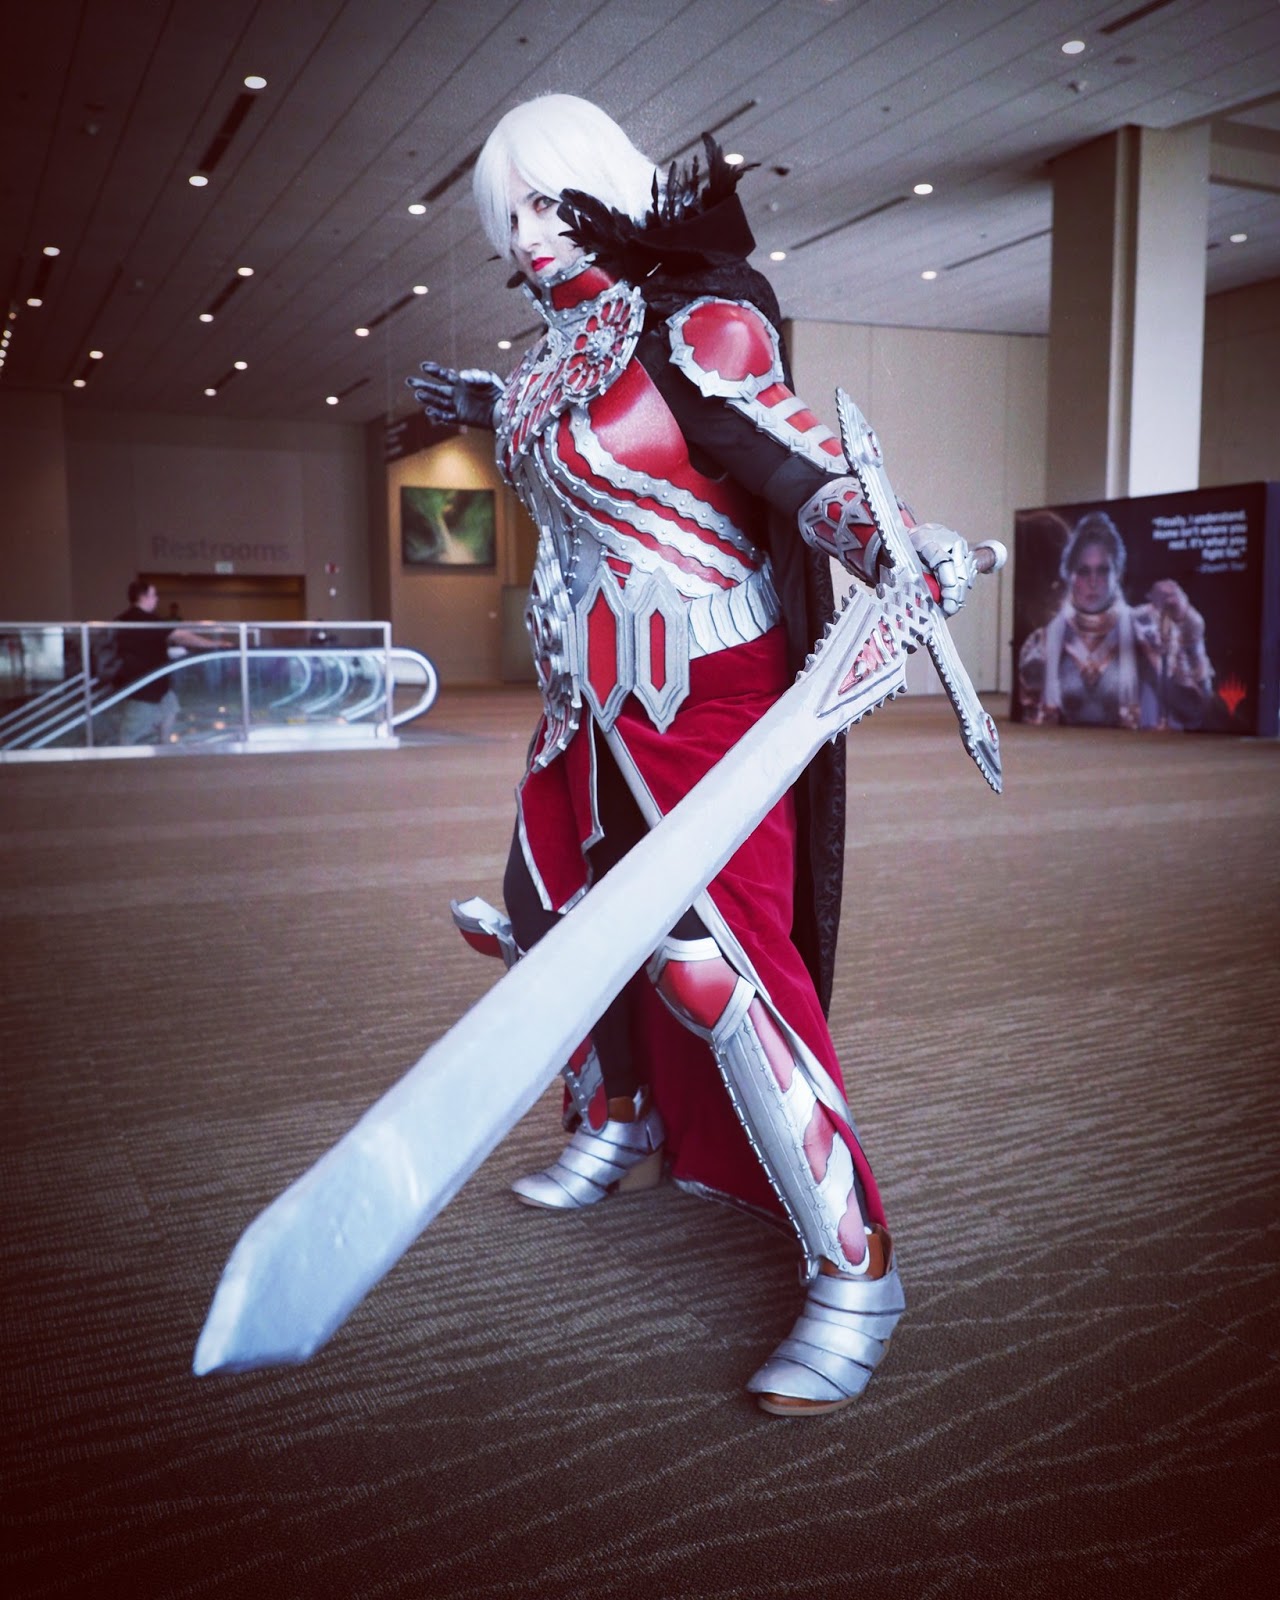
Edgar Markov at MTG Seattle 2019, Photography by @BibliovoreOrc.
Start by looking at photos, videos, or descriptive references of your character’s armor. Make lists or sketches of details and things to include. Sometimes when looking at reference sources to base your creations off you can’t find high enough resolution art, or there’s only the torso or front showing so you have to make up the rest, and that’s one Kensadi’s favorite parts of creating cosplays.
For Edgar she started by using a pattern provided by another cosplayer who has a similar torso length and everything else on top she patterned out herself! For the gorget—the collar that protects the throat—she blew up a pattern and flattened it out for the dimensions. Then she enlarged the Edgar art to match the size of the gorget to get dimensions to work with her body. She drew on gothic armor imagery for the rest of her inspiration. The entire process took roughly three months on her spare time.
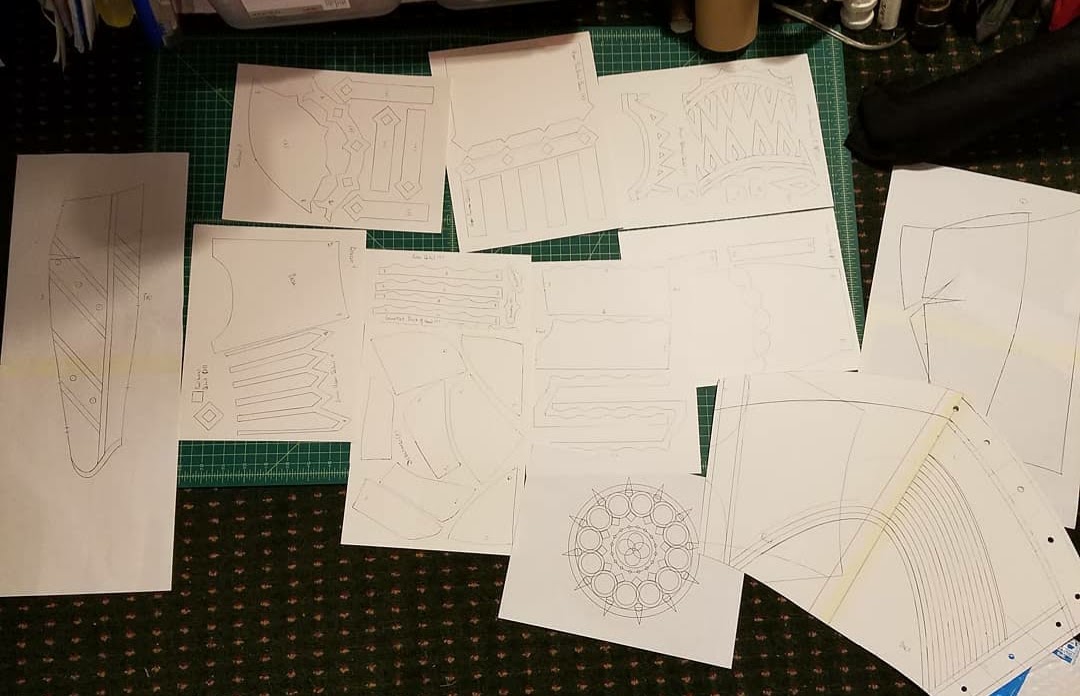
Pattern pieces printed out for transfer to foam.
Three months?! That is a lot of time, even for those of us with extra spare time during Quarantine from COVID-19, so I have two beginner friendly solutions. Make a pattern specifically fit for you by wrapping yourself in a duct-tape cast (with plastic wrap or tissue paper between your skin). This video does a great job of demonstrating duct tape casting. Additionally, you can use a pre-made printable pattern. Here is a large variety of armor pieces from Kamui cosplay—some purchase required (~$5 each).
Assembly
Once your pattern pieces are cut out you are ready to assemble. Mark which side of your material is front and back, left or right, and use dashes and darts to make sure your piece aligns correctly when you connect them. Thermoplastics self-adhesive quality means all that is needed is a heat gun to get the material soft enough to bond together.
Because foam is not self-adhesive, you will need to use contact cement in a well ventilated area. With foam, taking a few extra steps will greatly beautify the results of your project. A dremel may be used to sand seams to smooth perfection. This is also a point where the weathering and texture can be added to the soft foam before sealing, using an Exacto Knife or wood burning tools like a hot knife.
Kensadi also gives us one of her favorite tricks of the trade: glue on googly eyes for grommet details:
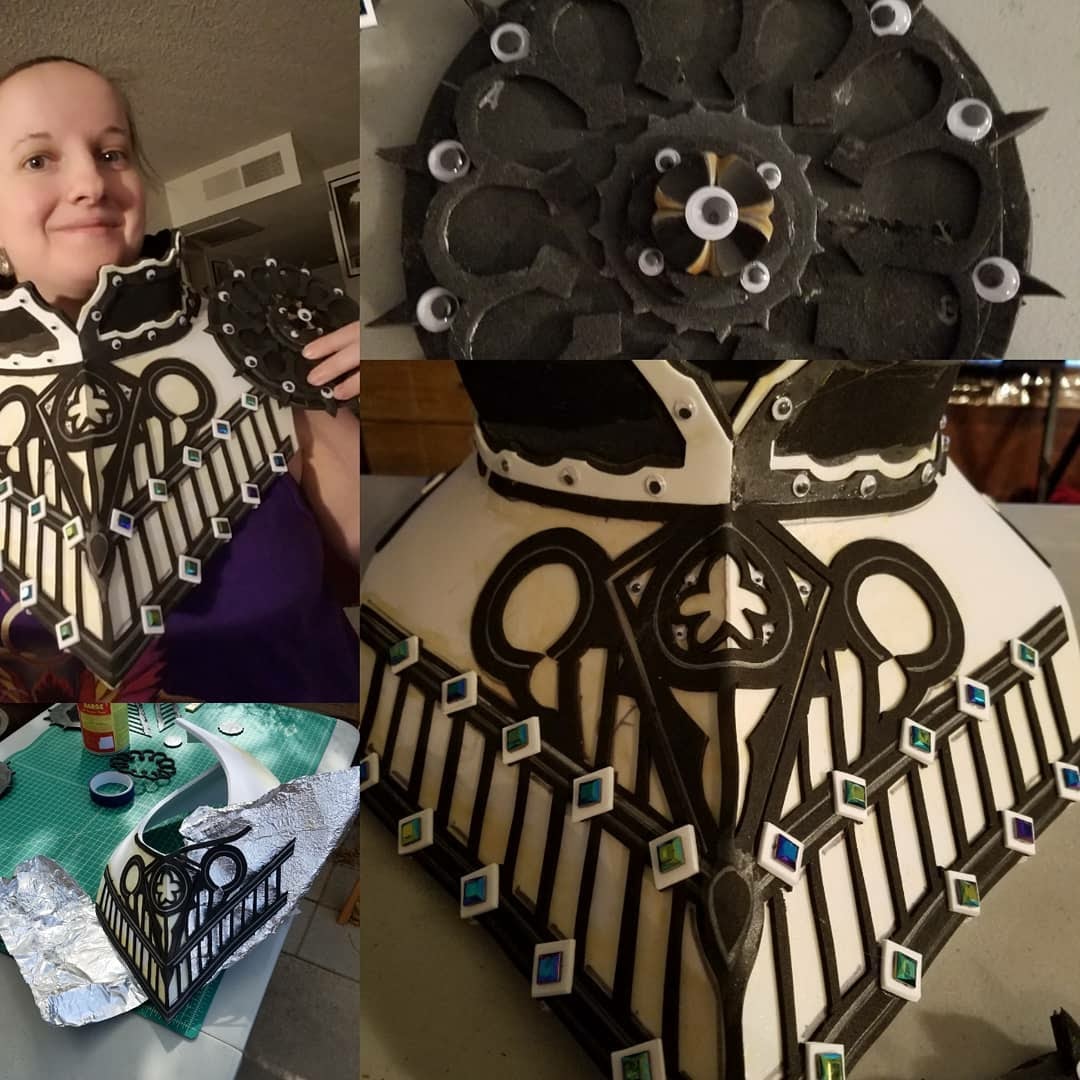
For foam projects, before painting you will need to seal the foam with an air-drying rubber coating to preserve your shapes while priming it for painting. Kensadi uses Plasti Dip by spraying on for projects that don’t need sanding and Creature Cast for projects that need smoother finishes.
Here is a wonderful video of Kamui Cosplay priming EVA foam. For thermoplastic projects, priming with wood glue is recommended. Always prime in a well ventilated area and/or wear a particle mask. Finally, paint can be applied and attachments added in the form of velcro, elastics and nylon webbing, Kensadi even uses a harness to help hang armor items on! Here’s an awesome video from Punished Props on Sealing and Painting, and how to attach armor with velcro straps.
If you are looking for guidance on certain cosplay construction, Kensadi recommends doing research online. There is a wealth of knowledge on YouTube with video instructions and tutorials to inspire. In fact everything covered above is captured in a concise video by Kamui Cosplay.
Erebos
Now that we have gone through the basics with Edgar, I want to highlight Kensadi’s innovation in making Erebos. For the project, she made an incredibly large horned headpiece and face-shaped pauldrons. Kensadi was able to channel every iteration of death cosplaying Erebos!
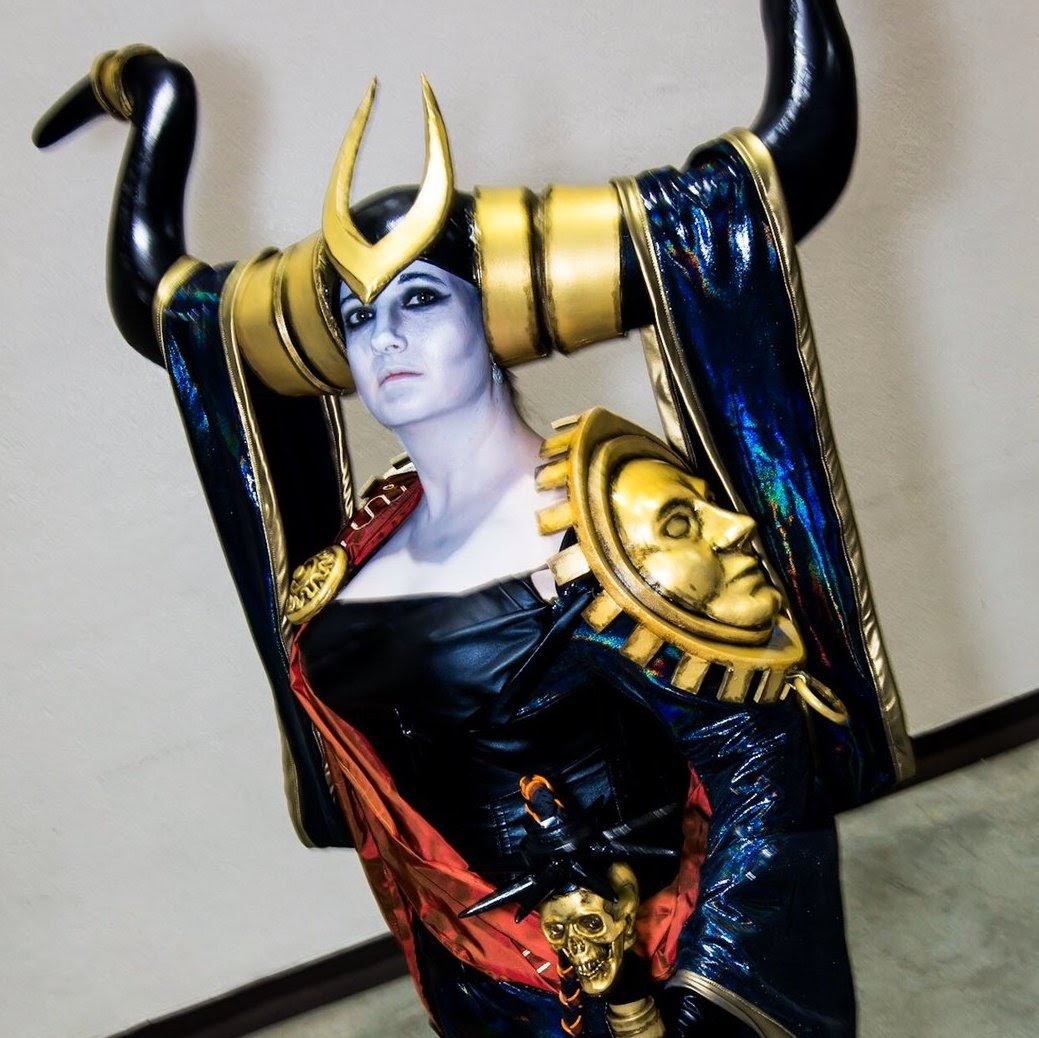
Erebos, God of the Dead at MTG Reno 2020. Photographed by AntTree Studio.
The horns are an incredible feat, and Kensadi documented a lot of the process on her social media! She drew on a flat piece of cardboard the size and shape she wanted and taped crumpled newspaper to make a flat cut-out three-dimensional. From there she was able to pattern her horns and helmet by covering the 3D pieces and her cork mannequin head (the same dimensions as her noggin), by covering them in fabric to get pattern pieces she could cut out and apply onto foam. From there she assembled with the described techniques above.
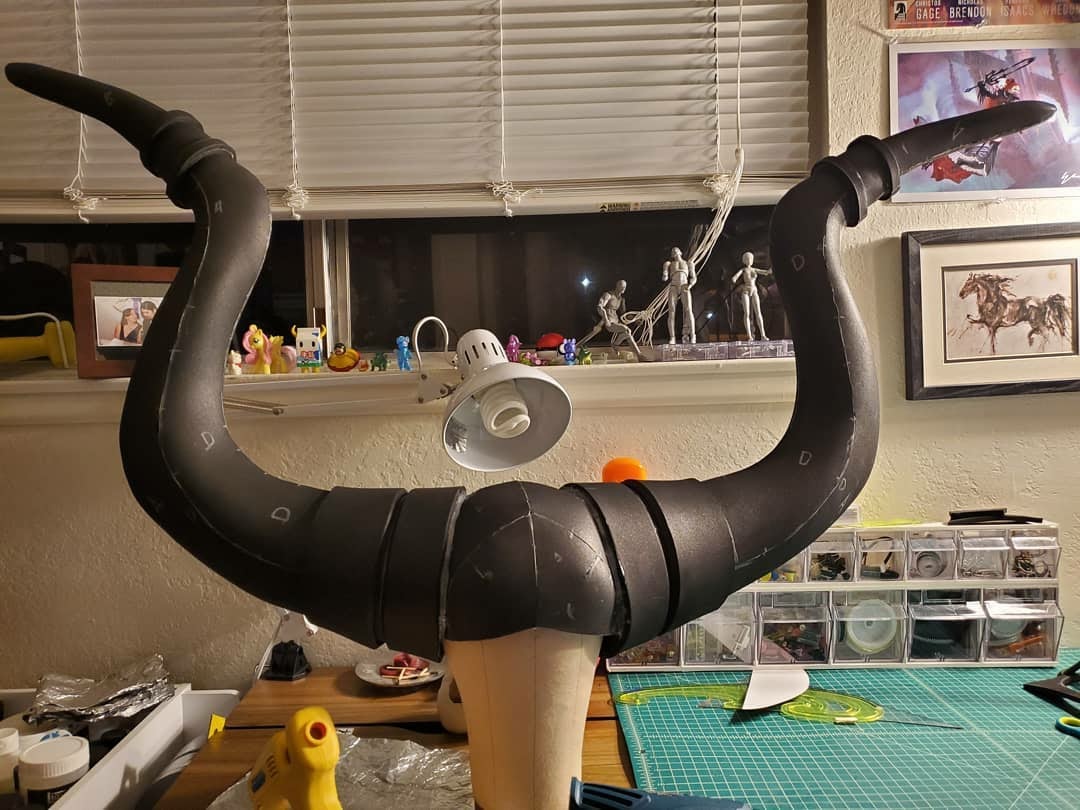
A clear view of how the horn’s patterned and assembly comes together.
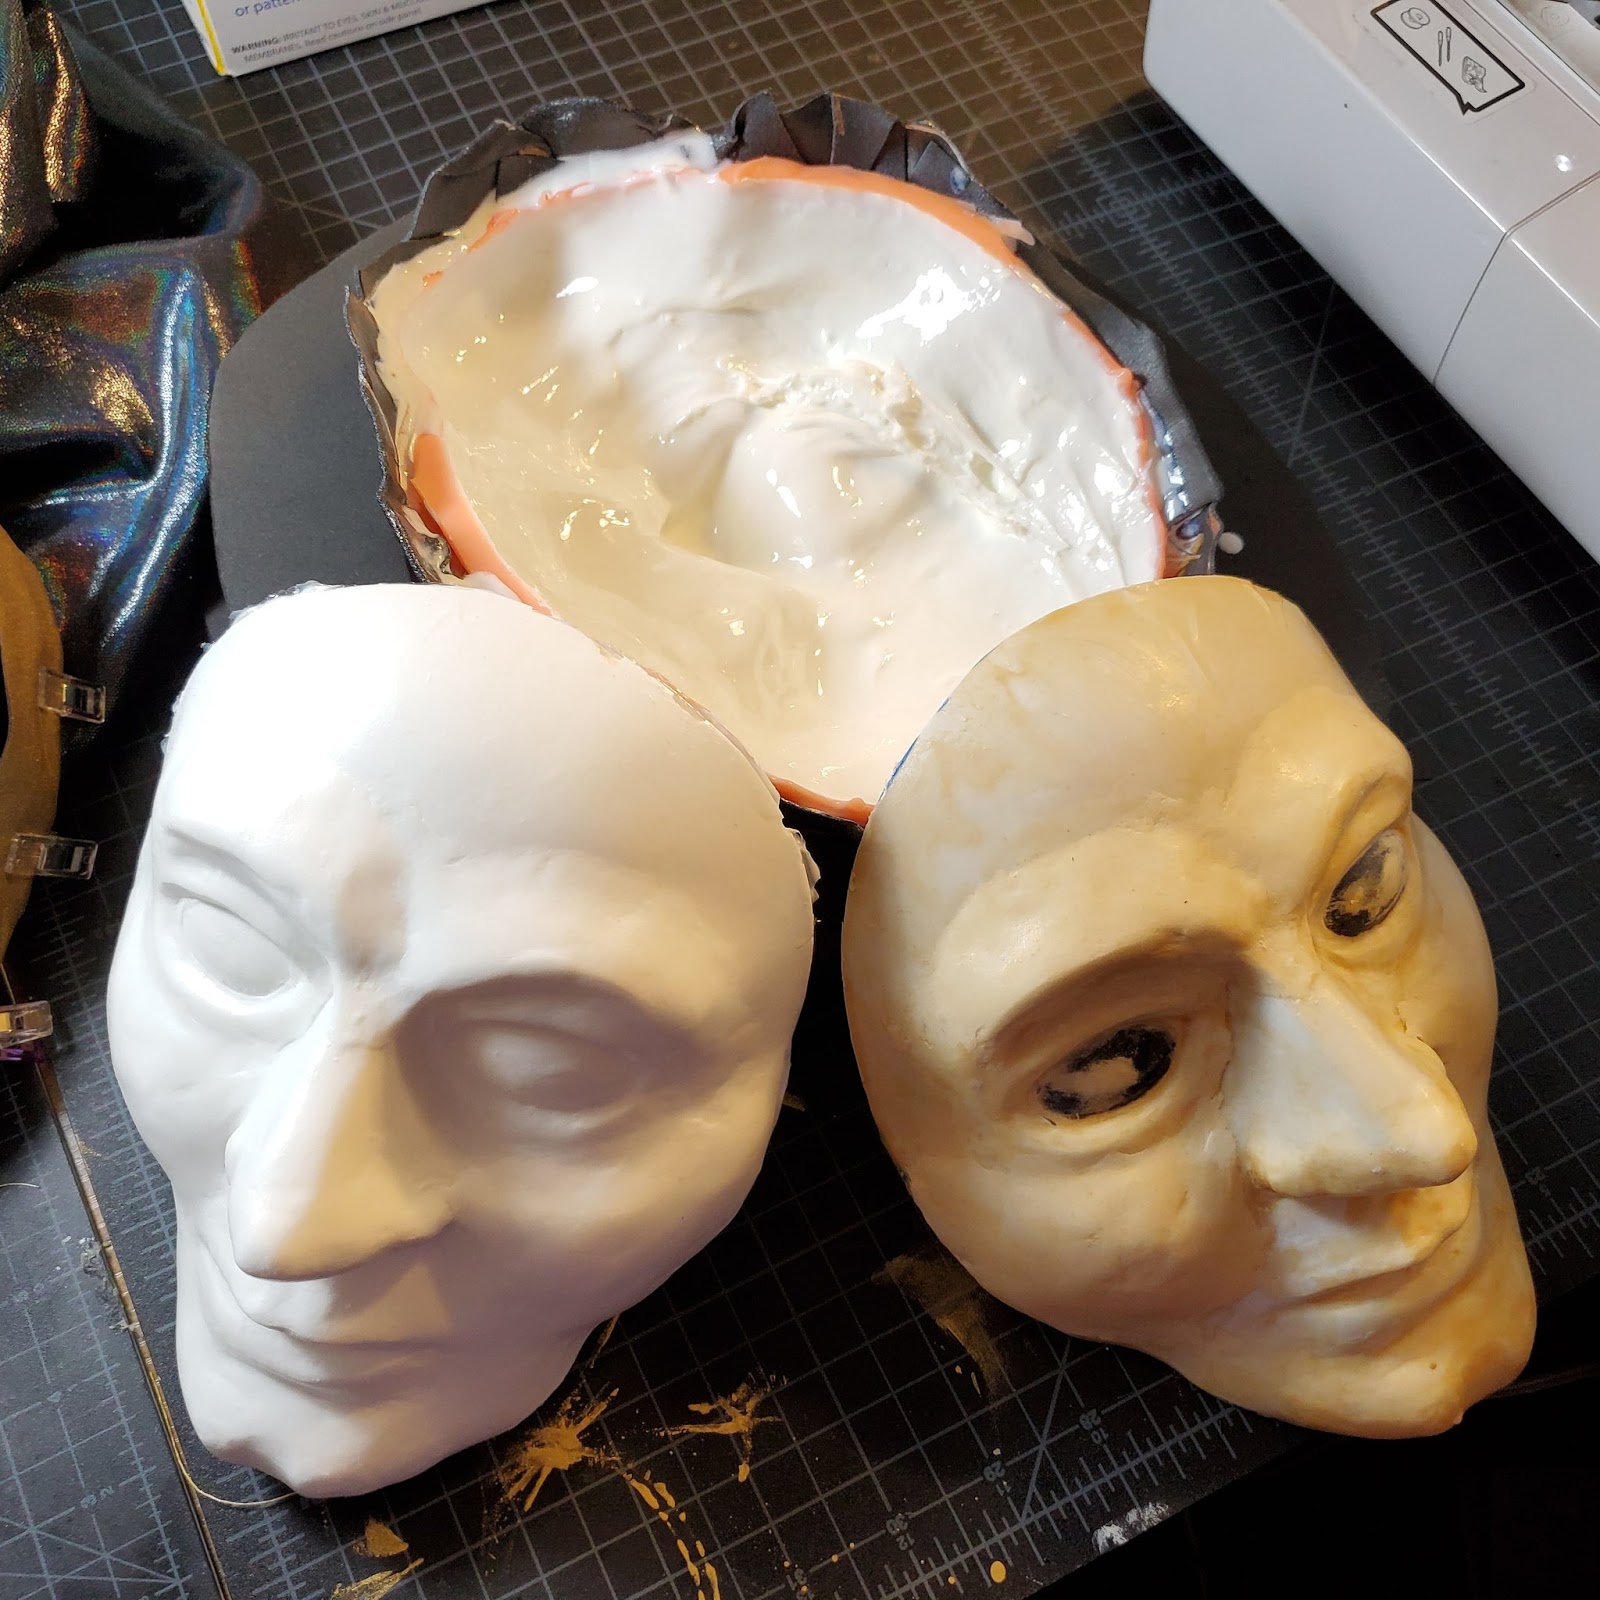
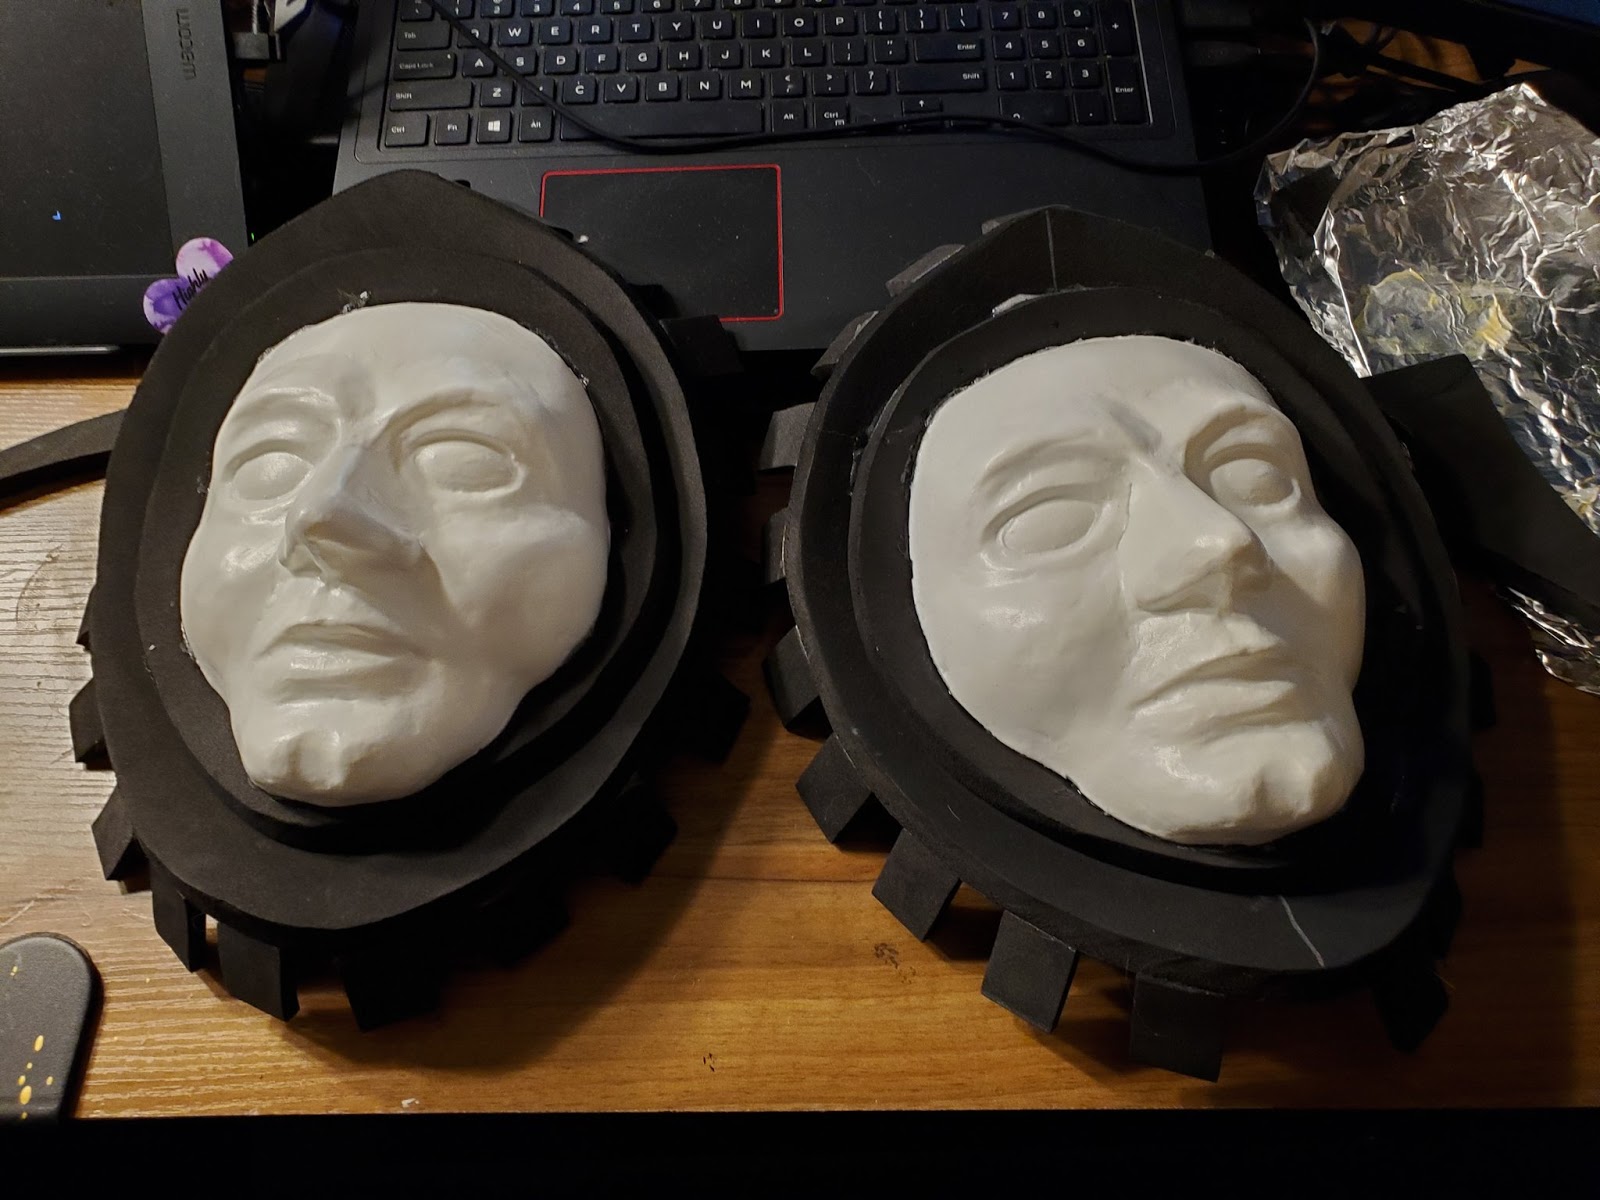
Sculpting the pauldrons is a show stopping process as well. Kensadi used her resources by starting with a pre-made mask and filled in the eyes with Worbla. She added details on top of the mask using paper clay, and she glued those pieces to the mask to have the face shape and expression she desired to match the card art. Following a little sanding, she covered her mold in wood glue and covered that in silicone to create a mold. After waiting about four hours the silicone mold was cured, and she was able to fill it with a liquid plastic resin to create two identical faces, taking about fifteen minutes each!
I appreciate the realistic attitude Kensadi has towards creating cosplay and it has helped her yield some superb cosplays. With all the experience she has acquired Kensadi leaves us with this advice, “Let things go. Sometimes stuff doesn’t work. It’s completely ok. It wasn’t a waste of time, it wasn’t a waste of resources, you learned something. If you get too frustrated just work on another aspect of the costume or just walk away. Which I really think can apply to real life as well.” Kensadi’s been working on a set-up in her craft room to stream work in progress and is open to answering your questions around cosplay, give her a follow on Twitter.
What an incredible look inside armor with this great cosplay artist Kensadi from start to finish. If this felt a little over your head, check out my article from last week with some more simplistic ideas to cosplay-from-home. I’m thrilled to take you on an unseen hair and makeup journey in my next article.
Zenaide “ZBexx” Beckham is an Oregon-based cosplayer, gamer, and MTG judge. Her favorite format is Legacy, because just like performing in dance or cosplay she gets to Show and Tell.